Plan Details:
This feature is available in Scale and Scale plus plans.
Only Admin users will be able to setup Routing modes.
Types of Routing mode:
1. Broadcast mode.
2. Auto-assign mode.
Broadcast mode:
- This is the default routing mode setting when you sign up for a HappyFox Chat account.
- The incoming chat notification will be displayed to all the available agents.
- An agent will be able to handle unlimited chat requests.
Auto -Assign mode:
- An agent will be able to handle unlimited chat requests.
- The incoming chat request will be auto-assigned to a particular agent based on LOAD (no of chats he/she is attending).
- If all the agents are carrying the same load then chat will be assigned to a random agent.
Choosing the Routing mode:
1. Login to HappyFox Chat account with Admin's credentials.
2. Click on Chat routing from the main menu.

3. Choose the desired routing mode. Click on either of the radio buttons Broadcast or Auto assign.

Setting up maximum chat limit for the agent:
This can be done in two ways,
1. Company level.
2. Agent level.
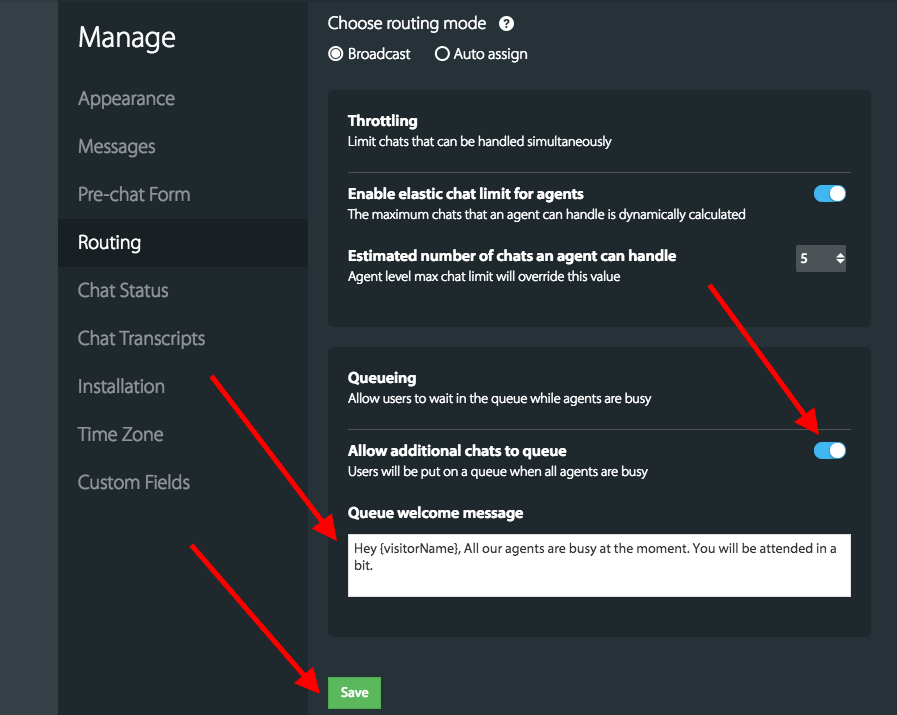
1. Steps to setup Company level max chat limit(Throttling).(Common for both the Broadcast and Auto-assign routing modes)
If you want to set Company level maximum chat limit for an agent, you can enable throttling by Toggling ON 'Enable elastic chat limit for agents' and provide the no of chats an agent can handle in the pop up box.


Once your agents are in their maximum chat limit, the Offline form will be displayed to your visitors. They can send offline messages.
You can alternatively hide widget when agents are busy by Toggling ON 'Hide widget when all agents are busy'
2. Steps to setup Agent level max chat limit:
1. To setup, In admin's login, go to the Agents page.

2. Click on a particular agent tile and set the max chat limit.
3. You can also unset the max chat limit here.
4. Click the Save button.

Note: This individual agent level max chat limit will supersede the company level max chat limit count (if set).
******Do not like to show an offline form when the agents are busy? No problem, you can set up queueing******
Setting up Queueing:
If you want your visitors to wait in the queue and want the chat window to display a queue message, you can simply turn ON queueing. The queue message is customizable. Please refer the below screenshot,
When all the agents are in their max chat limits (BUSY), awaiting message also known as queue message will be displayed in the chat window. Your visitors will be added to the queue automatically.
Agent side- Note the queued chat section in the sidebar,

Visitor chat window side, Note the queue message,

When the agent is free from his/her max chat limit, the chats will be automatically released from queue one by one and will be available for the agent to accept them.
**In the auto-assign mode of routing, chats will be automatically assigned to an agent. What if your agent misses to notice and Accept the incoming chat that it is auto-assigned to him/her?**
Don't you worry! you can instruct the app to automatically re-assign the unaccepted chat to the other available agent so that you don't miss your visitor.
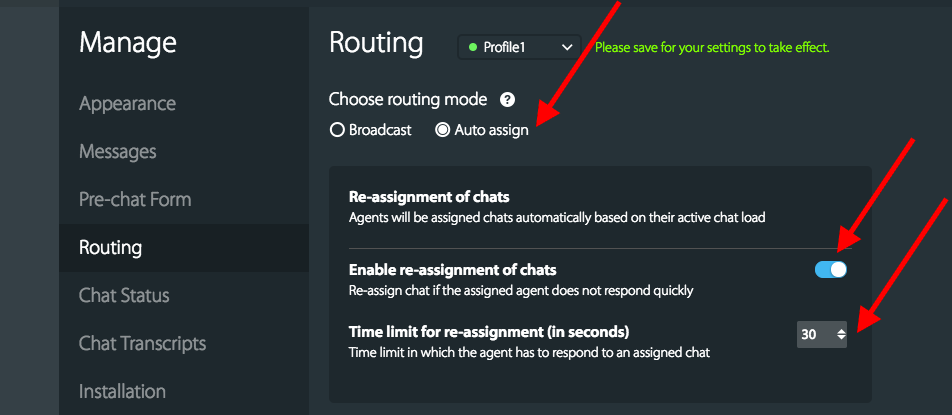
Setting up Re-assignment of Chats:
This is available when you have chosen Auto-assign as your mode of Routing chats.
1. Go to Re-assignment of chats section in the page and turn ON the toggle control
2. Set the time limit for re-assignment of chats. (in seconds.) and save the page.